Mucus builds up in your airways faster than you might think. Whether you manage COPD, cystic fibrosis, bronchiectasis, or you’re recovering from chest surgery, learning a few reliable airway clearance exercises at home can make a real difference in how you breathe day to day. You don’t need a clinic visit every time your chest feels congested. With the right technique and a little consistency, you can loosen and move secretions on your own schedule.
This guide walks you through the most effective airway clearance techniques you can perform with little to no equipment. I’ll break down each movement the way I’d show a client in a session: what to do, what it should feel like, how many reps to target, and where people usually go wrong. By the end, you’ll have a simple routine you can follow in about 15 to 20 minutes.
Quick Answer: Airway clearance exercises at home include huff coughing, controlled coughing, diaphragmatic breathing, pursed-lip breathing, and (with a device) positive expiratory pressure (PEP) therapy. A typical session runs 10–20 minutes, 1–3 times daily, and requires no special equipment beyond an optional PEP valve. The goal is to loosen mucus, open small airways, and move secretions toward the throat so you can expectorate safely.
What Are Airway Clearance Exercises? (Structures and Muscles Involved)
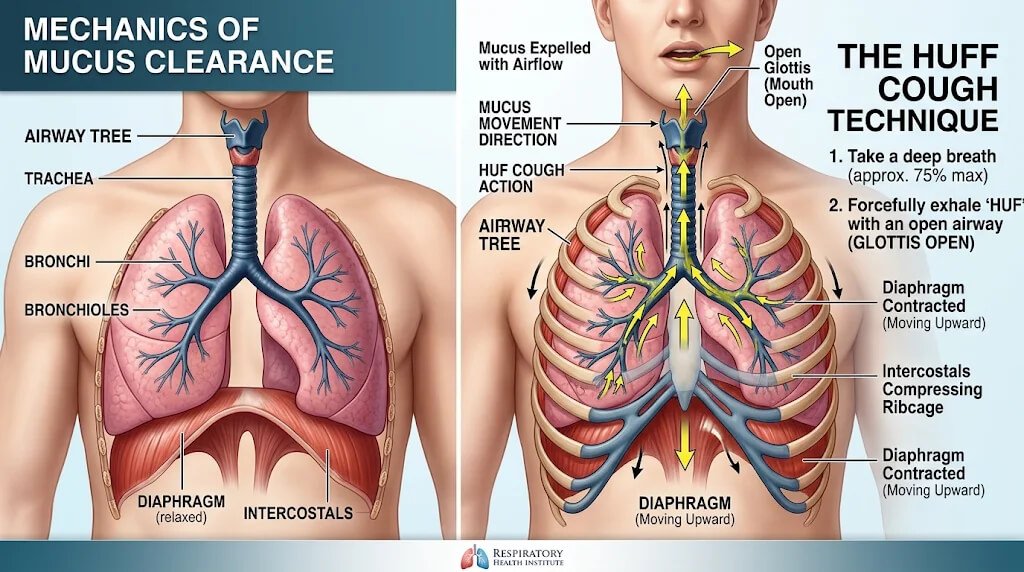
Airway clearance techniques are a group of breathing and movement strategies designed to help your lungs move mucus out of the bronchial tubes and smaller airways. Instead of letting secretions sit and thicken, these exercises create airflow and gentle pressure changes that push mucus upward.
Primary structures and muscles worked:
- Diaphragm – your main breathing muscle; you’ll engage it heavily in diaphragmatic breathing and huff coughs
- External intercostals – the muscles between your ribs that expand your chest during inhalation
- Internal intercostals and abdominal muscles – used during forced exhalation (huffing, PEP)
- Scalenes and sternocleidomastoid – accessory neck muscles that assist during deeper breaths
- Bronchial and alveolar airways – the target structures where mucus accumulates
Secondary benefits:
- Improved chest wall mobility
- Reduced work of breathing over time
- Better oxygen exchange in the alveoli
- Lower risk of atelectasis (partial lung collapse) from retained secretions
Why Airway Clearance Exercises Matter
Research consistently links regular airway hygiene to fewer exacerbations and better quality of life in people with chronic airway diseases. The CDC notes that COPD affects over 15 million Americans, and managing mucus burden is a core part of daily care. For people with cystic fibrosis, the National Heart, Lung, and Blood Institute (NHLBI) recommends airway clearance as a daily priority to prevent infection and preserve lung function.
Practical benefits you can expect with consistent practice:
- Less chest tightness and congestion
- Easier breathing during daily activities
- Fewer episodes of productive coughing fits
- Improved sleep quality (less nighttime coughing)
- Reduced reliance on rescue inhalers or nebulizer sessions
- Greater confidence managing symptoms between medical appointments
These exercises don’t replace your prescribed medications or medical care. They complement your treatment plan. Think of them as the “maintenance” you do for your airways the same way you’d do mobility work for your joints.
Step-by-Step: The Core Airway Clearance Techniques
Below are the five techniques I recommend for a home routine. Do them in the order listed. Total time: about 15–20 minutes.
1. Diaphragmatic (Belly) Breathing – 5 minutes
This is your foundation. You’re training the diaphragm to do its job efficiently.
- Sit or lie on your back with knees bent. Place one hand on your chest, the other on your belly.
- Inhale slowly through your nose for a count of 4. Your belly hand should rise; your chest hand stays mostly still.
- Exhale gently through pursed lips (like blowing out a candle) for a count of 6. Your belly hand falls.
- Repeat for 10–15 breaths.
What it should feel like: A slow, smooth expansion of your lower ribs and belly. No shoulder shrugging. No neck tension.
Coach’s Tip: If your shoulders creep up on the inhale, you’re using accessory muscles instead of your diaphragm. Place a light book (2–3 lb / 1–1.4 kg) on your belly. The book should rise and fall with each breath. If it barely moves, slow the inhale down and focus on expanding your lower ribs.

2. Pursed-Lip Breathing – 3 minutes
This technique adds mild back-pressure to your airways, keeping small bronchioles open longer during exhalation.
- Inhale through your nose for 2 counts.
- Pucker your lips tightly (as if whistling).
- Exhale slowly and steadily through your pursed lips for 4 counts.
- Repeat for 8–10 cycles.
What it should feel like: A gentle “hiss” on the exhale. Your chest stays lifted a little longer before deflating.
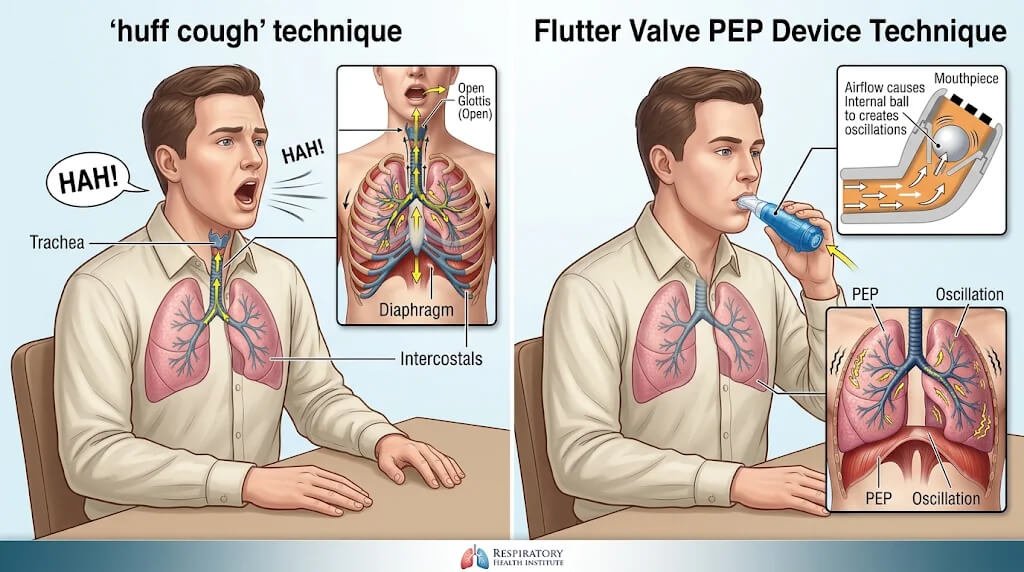
3. Huff Coughing – 3 minutes
The huff cough replaces a harsh, tiring cough with a controlled burst of air that moves mucus without collapsing your airways.
- Take a comfortable breath in through your nose (about 70% full).
- Open your mouth wide and your throat relaxed.
- Exhale in one or two short, forceful bursts while making a “HAH” sound (like fogging a mirror).
- Rest for one or two normal breaths.
- Repeat 3–5 times.
What it should feel like: A quick “pop” of air. You should feel vibration in your chest. It’s forceful but not painful. You should not feel like you’re gasping afterward.
4. Controlled Cough – 2 minutes
Use this after huffing to bring mucus to the throat.
- Take a medium breath in (not a full gasp).
- Hold for 2 seconds.
- Exhale with a short, sharp cough from your mid-chest.
- Swallow or spit out any mucus.
- Rest for 2–3 breaths. Repeat 2–3 times.
What it should feel like: A targeted “thump” in your chest. You should feel mucus shift. If you feel dizzy, reduce the force.
5. Positive Expiratory Pressure (PEP) – 5 minutes (optional, requires device)
PEP adds resistance to your exhale, creating pressure that props open small airways and pushes mucus outward. You need a PEP device (see equipment section below).
- Attach the mouthpiece to the device. Seal your lips around it.
- Take a normal breath in through your nose.
- Exhale slowly and steadily through the mouthpiece for 5–10 seconds. You’ll feel resistance.
- Repeat 8–10 breaths.
- Rest, then do 2–3 huff coughs to move loosened mucus.
- Repeat the PEP set 2–3 times.
What it should feel like: A gentle “push back” against your exhale. Your chest stays expanded a bit longer. The device may vibrate or make a soft buzzing sound (with oscillatory PEP).
Sets, Frequency, and Duration by Goal
| Goal / Condition | Technique | Sets | Reps per Set | Frequency | Total Time |
| Daily maintenance (COPD, bronchiectasis) | Diaphragmatic + Pursed-lip + Huff | 1 session | 10–15 breaths each | 1–2×/day | 15 min |
| Active mucus buildup (CF, post-op) | Full routine incl. PEP | 1 session | As above + 3 PEP sets | 2–3×/day | 20 min |
| Pre-exercise warm-up (before cycling, swimming) | Diaphragmatic + Pursed-lip | 1 set | 10 breaths each | Before each session | 5 min |
| Post-exercise clearance (after aerobic work) | Huff + Controlled cough | 1 set | 5 huffs, 3 coughs | After each session | 5 min |
| Nighttime congestion relief | Diaphragmatic + Pursed-lip | 1 set | 10 breaths each | Before bed | 5 min |
Adjust based on how you feel. If a session leaves you breathless or dizzy, shorten it and build back up over a week or two.
Common Mistakes and Fixes
Common Mistake: Huffing too hard or too fast. Many people turn the huff into a violent cough, which collapses small airways and tires the accessory muscles.
Fix: Think “fog the mirror,” not “cough the lungs out.” The sound is a relaxed “HAH,” not a barking cough. If your face turns red or you feel lightheaded, you’re going too hard. Slow down, take two normal breaths, and try again at about 60% effort.
Other frequent errors:
- Shoulder shrugging during diaphragmatic breathing. Fix: Keep shoulders down. Focus on expanding the lower rib cage, not lifting the chest.
- Holding the breath too long during PEP. Fix: Exhale for 5–10 seconds max. If you feel lightheaded, stop and rest.
- Skipping the rest breaths between huffs. Fix: Always take 1–2 normal breaths between huff repetitions. Your airways need time to re-expand.
- Doing the routine while lying flat. Fix: Sit upright or lean slightly forward on a table. Gravity helps mucus move toward larger airways.
Variations: Easier to Harder
Regression (easier version):
- Do diaphragmatic breathing while lying on your back with knees bent (reduces gravitational load).
- Reduce huff force to 40–50% effort.
- Shorten PEP exhales to 3–5 seconds.
- Limit the full session to 10 minutes.
- Best for: first week of learning, post-surgical patients still fatigued, or anyone who feels dizzy.
Progression (harder version):
- Add 2–3 extra huff repetitions per set.
- Increase PEP resistance (turn the dial on oscillatory devices to a higher setting).
- Perform the routine while standing or walking slowly in place.
- Add 2 minutes of light aerobic activity (marching, stationary cycling at low resistance) between sets to increase tidal volume.
- Best for: experienced users who feel their routine is “too easy” and want to push mucus clearance further.
Equipment Options for Home Airway Clearance
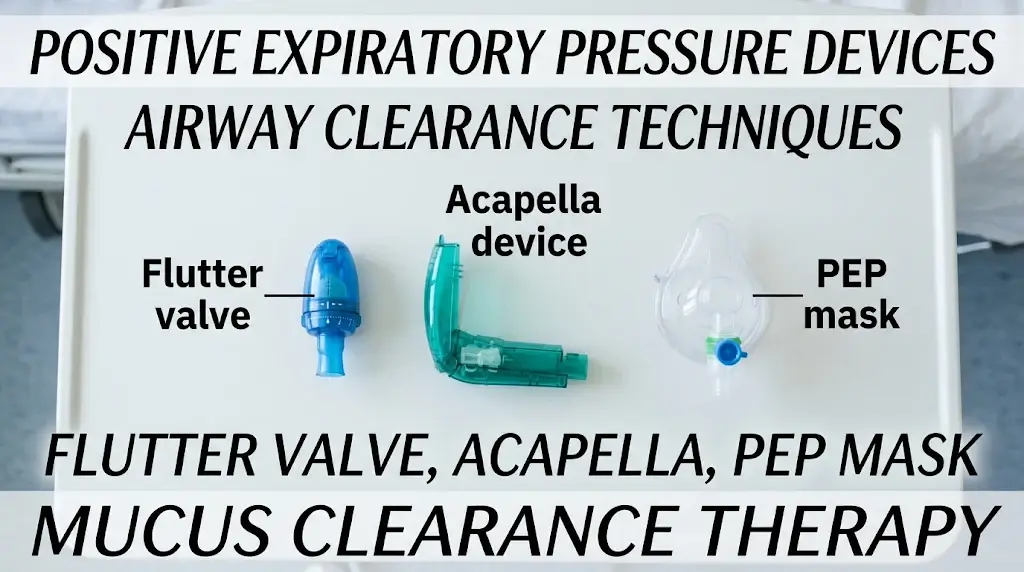
You can do the first four techniques with zero equipment. PEP therapy requires a small handheld device. Here’s what’s available:
| Device Type | Examples | How It Works | Best For |
| Non-oscillatory PEP | Thimble valve, discrete PEP mask | Adds fixed resistance to exhale | Simple, low-cost option |
| Oscillatory PEP (oPEP) | Flutter valve, Acapella, Aerobika | Adds resistance + high-frequency vibration | CF, bronchiectasis, mucus that’s sticky |
| Incentive spirometer | Standard 3-tier or digital | Encourages slow, deep inhalation | Post-surgical atelectasis prevention |
| High-frequency chest wall oscillation (HFCWO) | Vest-type (e.g., InnoVest, Corvent) | Padded vest inflates/deflates rapidly | CF, severe mucus burden |
How to choose:
- If you’re new, start with no equipment (huff cough + diaphragmatic breathing).
- If your doctor or respiratory therapist recommends PEP, ask which type fits your condition. Oscillatory PEP is often preferred for CF and bronchiectasis because the vibration helps break up sticky mucus.
- HFCWO vests are a larger investment and are typically prescribed for CF or severe bronchiectasis. [VERIFY current pricing and insurance coverage before purchasing.]
Who Should Be Careful
Airway clearance exercises are generally safe for most adults, but check with your doctor or respiratory therapist before starting if you:
- Have a recent chest or abdominal surgery (within 4–6 weeks)
- Have uncontrolled high blood pressure or a recent heart event
- Have a known pneumothorax (collapsed lung) or are at high risk for one
- Are pregnant (especially in the third trimester)
- Have a bleeding disorder or are on blood thinners (vigorous coughing can irritate the airway)
- Experience chest pain, dizziness, or significant shortness of breath during the exercises
Stop the session and seek medical attention if you notice:
- Chest pain or pressure
- Bluish lips or fingernails (cyanosis)
- Severe dizziness or fainting
- Coughing up a large amount of bright red blood
- Worsening shortness of breath that doesn’t improve with rest
This article is for general information and is not a substitute for advice from a doctor or physical therapist.
Sample 15-Minute Home Airway Clearance Routine
Here’s a full session you can follow. Do it seated in a comfortable chair, slightly leaning forward with forearms on your knees or a table.
| Step | Technique | Duration | Notes |
| 1 | Diaphragmatic breathing | 4 min | 15 breaths, 4-in / 6-out |
| 2 | Pursed-lip breathing | 3 min | 10 cycles, 2-in / 4-out |
| 3 | Huff coughing (×3) | 3 min | 5 huffs per set, rest between |
| 4 | PEP with Flutter valve | 4 min | 3 sets of 8 breaths, huff after each set |
| 5 | Controlled cough + rest | 1 min | 2–3 coughs, then 3 slow breaths |
Weekly schedule suggestion:
- Monday / Wednesday / Friday: Full 15-minute routine above.
- Tuesday / Thursday: 5-minute diaphragmatic + pursed-lip only (maintenance).
- Saturday: Full routine + 10 minutes of light aerobic activity (walking, cycling) to boost overall lung capacity.
- Sunday: Rest or 5-minute diaphragmatic breathing only.
Build the routine into a daily habit. Set a phone reminder for morning and evening if needed. Consistency matters more than intensity.
Building Overall Energy Supports Your Breathing Work
Clearing your airways is one piece of the puzzle. The other piece is general cardiovascular fitness. Even 20 minutes of walking, cycling, or swimming a few times a week can improve your oxygen delivery and reduce the effort your breathing muscles need. If you’re looking for ways to increase energy and stamina naturally, pairing light aerobic work with your airway clearance routine gives your lungs a two-pronged boost.
Frequently Asked Questions(FAQ)
How often should I do airway clearance exercises at home?
Most respiratory therapists recommend 1–3 sessions per day, depending on your condition and mucus production. People with cystic fibrosis often do two to three sessions daily. For COPD or post-surgical recovery, once or twice daily is typical. Follow your care team’s guidance.
Can I do airway clearance exercises without any equipment?
Yes. Diaphragmatic breathing, pursed-lip breathing, huff coughing, and controlled coughing require nothing but your own breath and a chair. PEP therapy and HFCWO are optional add-ons that your doctor may recommend for heavier mucus burdens.
What is the huff coughing technique and how is it different from a regular cough?
A huff cough is a short, forceful exhale with an open throat and a “HAH” sound. It moves mucus without the violent pressure spike of a hard cough, which can collapse small airways. A regular cough is more abrupt and can tire you out if repeated many times.
How long do airway clearance exercises take?
A full session runs 15–20 minutes. A quick maintenance session (diaphragmatic + pursed-lip breathing) takes about 5 minutes. Most people fit the routine into their morning or evening routine without major schedule changes.
Are airway clearance exercises safe to do every day?
For most people with chronic airway conditions, daily practice is safe and recommended. If you feel dizzy, experience chest pain, or notice worsening breathlessness, stop and contact your doctor. Start with shorter sessions and build up over the first week or two.
Do airway clearance exercises work for asthma?
Asthma management focuses more on reducing inflammation with controller medications. However, gentle diaphragmatic and pursed-lip breathing can help with breathlessness during or between episodes. Huff coughing is generally not a priority in well-controlled asthma. Ask your pulmonologist whether clearance techniques fit your specific asthma plan.
Conclusion: Make It a Habit, Not a Chore
Airway clearance exercises at home are one of the most practical tools you have for keeping your lungs working efficiently between medical appointments. The techniques are simple, they take 15 to 20 minutes, and most require no equipment at all. The key is consistency. Do the routine at the same time each day, track how your chest feels over a few weeks, and adjust the intensity as your comfort improves.
Start with diaphragmatic breathing and huff coughing this week. Add PEP if your doctor recommends it. Pair the routine with light aerobic activity a few times a week. Over time, you’ll likely notice less congestion, easier breathing, and fewer “bad chest” days.
Your airways don’t clear themselves. A few minutes of focused breathing and controlled exhalation each day is the most direct thing you can do to help them.