Optimizing your respiratory mechanics is one of the most overlooked aspects of overall fitness and long-term health. While most gym-goers focus on lifting heavier weights or running faster, they often neglect the foundational system that fuels those efforts: the lungs. The huff cough technique, clinically known as the Forced Expiration Technique (FET), is a highly effective, evidence-based breathing method designed to clear airways, reduce the work of breathing, and improve core engagement.
Originally developed for pulmonary rehabilitation, this technique has proven valuable for a wide demographic. Whether you are a senior managing age-related respiratory changes, an athlete seeking better diaphragmatic control, or someone recovering from a respiratory illness, mastering this method can transform your breathing efficiency. Unlike a traditional, harsh cough that can irritate the throat and collapse small airways, the huff cough uses controlled, forced exhalations to mobilize secretions gently.
In this comprehensive guide, we will break down the anatomy, step-by-step execution, and practical programming of the huff cough technique. You will learn how to integrate this powerful tool into your daily routine safely and effectively.
Quick Answer
The huff cough technique is a controlled breathing method used to clear mucus from the lungs without the airway collapse caused by harsh coughing. To perform it, sit upright, take a slow, deep breath in, and exhale forcefully with an open mouth as if fogging up a mirror. Repeat this 2 to 3 times, followed by a period of relaxed breathing to prevent dizziness.
Muscles Worked During the Huff Cough Technique
Understanding the biomechanics of the huff cough technique requires a look at the respiratory and core musculature. This is not a passive activity; it is an active, coordinated muscular effort that engages both primary and secondary muscle groups to generate optimal expiratory flow.
Primary Muscles Worked:
- Diaphragm: The primary muscle of inspiration. During the inhalation phase of the huff, the diaphragm contracts and descends, creating negative pressure to fill the lungs with air. A strong, flexible diaphragm is essential for achieving the necessary tidal volume before the huff.
- Transversus Abdominis: The deepest layer of the abdominal wall. During the forced exhalation (the “huff”), this muscle contracts to increase intra-abdominal pressure, pushing the diaphragm upward and forcing air out of the lungs at a controlled, high velocity.
- Internal Intercostals: Located between the ribs, these muscles depress the ribcage during forced exhalation, actively decreasing the volume of the thoracic cavity to expel air.
Secondary Muscles Worked:
- External Intercostals: These assist in stabilizing the ribcage during the breathing cycle, ensuring the chest expands fully during the preparatory inhale.
- Scalenes and Sternocleidomastoid: These accessory muscles of inspiration may engage slightly during the deep inhalation phase, particularly in individuals with compromised lung function, to help elevate the upper ribs.
- Pelvic Floor: Works in synergy with the transversus abdominis. As intra-abdominal pressure rises during the huff, the pelvic floor provides a stable base of support, preventing downward pressure and maintaining core integrity.
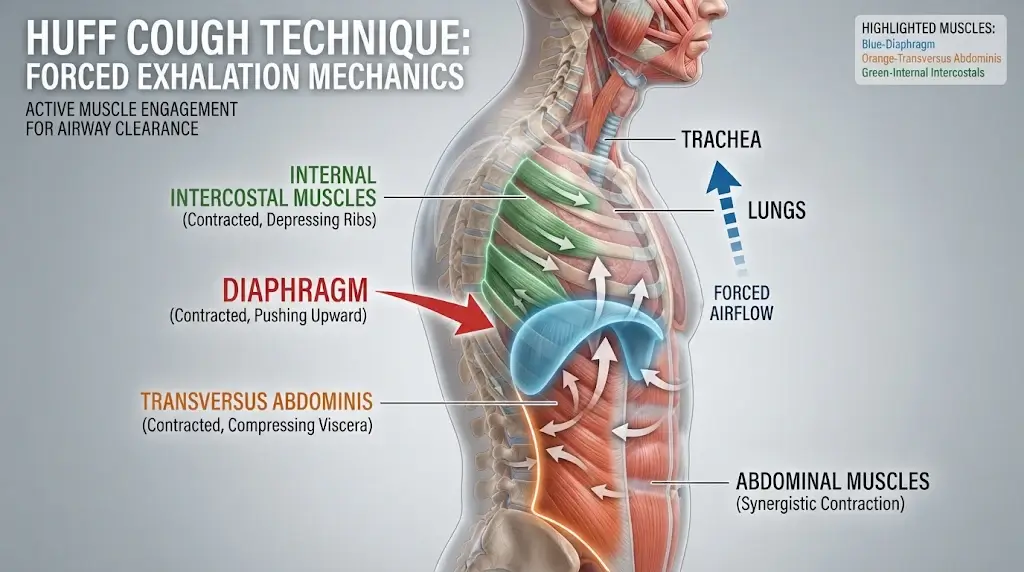
By engaging these muscles in a coordinated sequence, the huff cough technique generates shearing forces in the airways. This specific type of airflow is what effectively detaches mucus from the bronchial walls without causing the traumatic pressure spikes associated with traditional coughing.
Benefits of the Huff Cough Technique
Incorporating the huff cough technique into your daily health or recovery routine offers several evidence-based benefits. It is widely recommended by respiratory therapists and pulmonologists for good reason.
1. Superior Mucus Clearance A traditional cough involves a rapid, forceful closure of the glottis followed by a violent explosion of air. While this can clear the upper airways, it often causes the smaller, flexible airways in the lungs to collapse, trapping mucus deeper inside. The huff cough keeps the glottis open, maintaining airway patency and allowing air to get behind secretions, pushing them upward toward the larger airways where they can be easily expelled. Research published in the Journal of Cardiopulmonary Rehabilitation and Prevention supports that forced expiration techniques are as effective, and often better tolerated, than traditional coughing for sputum clearance.
2. Reduced Work of Breathing For individuals with conditions like chronic obstructive pulmonary disease (COPD) or asthma, breathing can feel like a constant, exhausting chore. By clearing obstructed airways, the huff cough technique reduces airway resistance. This means your respiratory muscles do not have to work as hard to pull in oxygen, directly improving your overall energy levels. If you are looking for ways to increase energy and stamina naturally, optimizing your baseline breathing mechanics is a foundational step.
3. Improved Core Stability and Proprioception Because the technique heavily recruits the transversus abdominis and diaphragm, it doubles as a low-impact core stabilization exercise. Learning to control your intra-abdominal pressure through breathing translates to better bracing mechanics during weightlifting, running, and daily functional movements.
4. Prevention of Respiratory Infections Stagnant mucus in the lungs is a breeding ground for bacteria. Regular use of airway clearance techniques helps prevent secondary infections, such as pneumonia, which is a critical consideration for older adults and those with compromised immune systems. Maintaining clear airways also supports normal energy metabolism, as efficient oxygen delivery is required for cellular ATP production.

Step-by-Step Form: How to Do the Huff Cough Technique
Proper form is critical to ensure the technique is effective and does not cause dizziness or throat irritation. Follow these precise, coach-approved steps to master the movement.
Step 1: Establish the Starting Posture Sit upright in a chair with your feet flat on the floor, about hip-width apart. Relax your shoulders, rolling them back and down about 2 inches (5 cm) to open up the chest cavity. If you are feeling fatigued, you can lean forward slightly, resting your forearms on your thighs. This tripod position maximizes diaphragmatic excursion.
Step 2: The Controlled Inhale Breathe in slowly and deeply through your nose for a count of 2 to 3 seconds. Focus on expanding your belly outward (diaphragmatic breathing) rather than lifting your shoulders. You want to fill the lower lobes of your lungs, where secretions often pool. Do not take a maximal, gasping breath, as this can trigger airway spasms.
Step 3: The Breath Hold Hold the breath gently for 2 to 3 seconds. This brief pause allows the inhaled air to distribute evenly behind any mucus plugs, setting up the pressure differential needed for the next step.
Step 4: The Forced Expiration (The “Huff”) Keep your mouth and throat wide open. Do not close your glottis. Exhale forcefully and steadily, making a “haaaah” sound, as if you are trying to fog up a mirror or clean your glasses with your breath. The exhalation should last about 3 to 4 seconds. You should feel your lower abdominal muscles tighten and pull inward.
Step 5: The Recovery Breath After 1 or 2 huffs, return to normal, relaxed breathing for 20 to 30 seconds. This recovery phase is non-negotiable. It prevents hyperventilation, resets your carbon dioxide levels, and relaxes the airways before the next cycle.
Step 6: The Final Clear Once you feel the mucus has moved up into your upper throat or windpipe, you can perform one single, gentle traditional cough to clear it from your mouth.
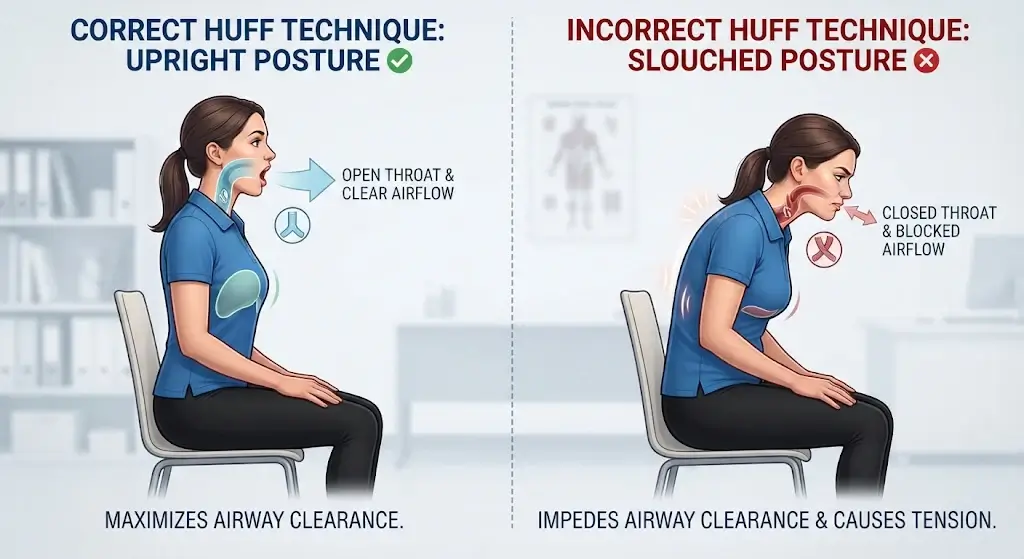
Coach’s Tip: Think of the huff as a “silent cough.” The moment you feel your throat tighten or your vocal cords close, you are doing it wrong. The sound should be a breathy, continuous “HAAAA,” not a sharp, barking noise.
Sets, Reps, and Frequency by Goal
How often you perform the huff cough technique depends entirely on your current health status and objectives. Below is a practical programming guide.
| Goal | Frequency | Sets (Cycles) | Reps (Huffs per set) | Rest Between Sets |
| Daily Maintenance | 1–2 times per day | 2–3 cycles | 2–3 huffs | 30 seconds of relaxed breathing |
| Active Congestion | Every 2–4 hours | 4–6 cycles | 2–3 huffs | 30–45 seconds of relaxed breathing |
| Post-Workout Recovery | After intense cardio | 1–2 cycles | 2 huffs | 30 seconds of relaxed breathing |
| Pre-Bronchodilator Use | 10 mins before inhaler | 3–4 cycles | 2 huffs | 30 seconds of relaxed breathing |
Note: A “cycle” consists of the inhale, hold, 1-2 huffs, and the recovery breathing period.
For athletes, integrating this after a heavy conditioning session can help clear the heavy, thick respiratory secretions that sometimes build up during high-ventilation efforts in cold or dry environments.
Common Mistakes and Fixes
Even simple breathing exercises can be performed incorrectly, leading to frustration or adverse effects like lightheadedness. Avoid these common pitfalls.
Common Mistake: Coughing Instead of Huffing. Many people instinctively close their glottis and bear down, turning the exercise into a series of harsh, traditional coughs. This spikes intrathoracic pressure, collapses the small airways, and irritates the vocal cords, defeating the entire purpose of the technique.
The Fix: Place a hand on your throat. If you feel your Adam’s apple or voice box jump up and slam shut, stop. Practice the “fogging the mirror” cue. Keep the throat completely relaxed and open, allowing air to flow out continuously without interruption.
Mistake 2: Hyperventilating Performing too many huffs in a row without adequate recovery breathing blows off too much carbon dioxide. This leads to respiratory alkalosis, causing dizziness, tingling in the fingers, and lightheadedness. Fix: Strictly adhere to the 1:10 ratio. For every 1 or 2 huffs, mandate at least 20 to 30 seconds of quiet, normal tidal breathing.
Mistake 3: Shallow Chest Breathing Inhaling only into the upper chest fails to get air behind the secretions located in the lower lung lobes. Fix: Place one hand on your chest and one on your belly. Ensure only the belly hand moves outward during the inhale.
Variations: Regression and Progression
Like any exercise, the huff cough technique can be scaled to match your current ability level.
Regression (Easier Version): Supported Seated Huff If you have severe fatigue, weakness, or balance issues, perform the technique while fully supported. Sit in a recliner or a bed propped up with pillows at a 45-degree angle. Place a pillow against your abdomen and hug it gently. When you huff, the pillow provides mild resistance and feedback, helping you engage your core without straining.
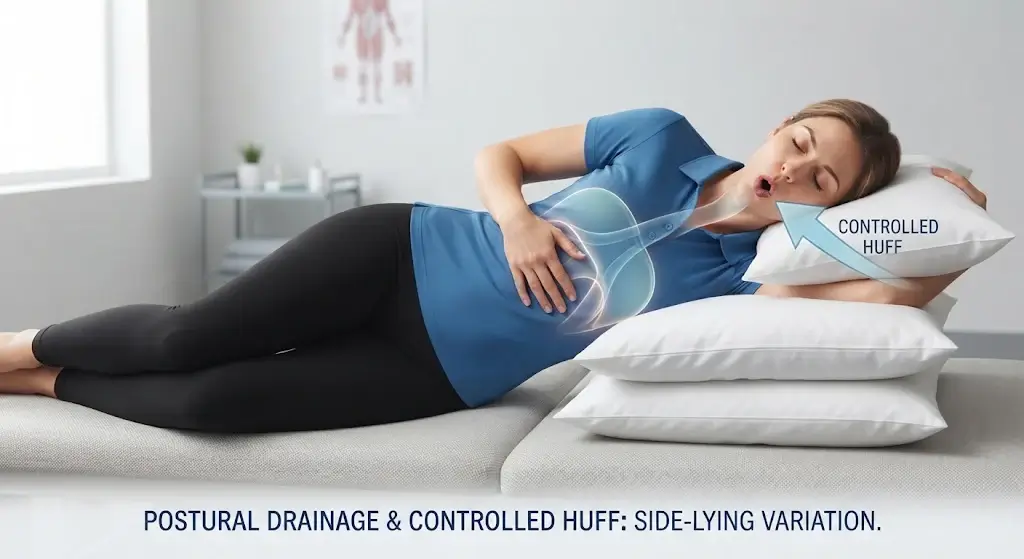
Progression (Harder Version): Active Cycle of Breathing Techniques (ACBT) with Postural Drainage For advanced clearance, combine the huff cough with gravity-assisted positioning.
- Lie on your side or on your stomach with your hips elevated 12 to 18 inches (30 to 45 cm) above your chest using pillows (postural drainage).
- Perform 30 seconds of relaxed, deep diaphragmatic breathing to expand the lungs.
- Perform 3 to 4 deep “breathing control” breaths.
- Execute 2 to 3 huff coughs from a medium lung volume.
- Return to relaxed breathing. This advanced method uses gravity to drain specific lung segments while the huff clears them, making it a staple in clinical cystic fibrosis and bronchiectasis management.
Alternatives to the Huff Cough Technique
If the huff cough technique is not suitable for you, or if you need to supplement it, consider these evidence-based alternatives.
1. Pursed-Lip Breathing This technique involves inhaling through the nose for 2 seconds and exhaling slowly through pursed lips (as if blowing out a candle) for 4 to 6 seconds. It creates positive expiratory pressure, which splints the airways open. It is excellent for managing shortness of breath during exertion but is less effective at actively moving mucus than the huff cough.
2. Autogenic Drainage This is a more complex, three-phase breathing method that requires training from a respiratory therapist. It involves breathing at different lung volumes (unstick, collect, and evacuate phases) to move mucus without any forced huffing or coughing. It is highly effective but has a steeper learning curve.
3. Positive Expiratory Pressure (PEP) Devices Devices like the Acapella or Aerobika provide resistance when you exhale into them. This resistance creates back-pressure that vibrates the airways, loosening mucus, while keeping the airways open. These are excellent tools to use immediately before performing a huff cough technique to maximize clearance.
Who Should Be Careful
While the huff cough technique is generally very safe, certain populations must exercise caution or seek medical clearance first.
- Recent Thoracic or Abdominal Surgery: The increase in intra-abdominal pressure can strain surgical incisions. Consult your surgeon before attempting forced expiration.
- Severe Osteoporosis: Forceful breathing mechanics can, in rare cases, place stress on fragile ribs. A gentler approach like pursed-lip breathing may be safer.
- Uncontrolled Hypertension or Aneurysms: The Valsalva-like effect of improper huffing can temporarily spike blood pressure. Strict adherence to keeping the glottis open is critical to avoid this.
- Pregnancy: While generally safe, pregnant individuals should avoid aggressive bearing down. A modified, gentler huff is recommended.
If you have any underlying health conditions, always consult your physician or a licensed physical therapist before starting a new respiratory exercise regimen. Proper guidance ensures you support your metabolism and overall health safely without unintended strain.
Sample 10-Minute Morning Respiratory Mobility Routine
Integrate the huff cough technique into a broader morning routine to wake up your nervous system, clear overnight secretions, and prepare your core for the day.
- Thoracic Extension (2 minutes): Sit tall. Interlace your fingers behind your head. Gently lean back over the back of your chair, opening your chest. Take 5 deep, slow breaths here.
- Diaphragmatic Warm-up (2 minutes): Place hands on your belly. Inhale through the nose for 3 seconds, feeling the belly rise. Exhale through the mouth for 4 seconds. Repeat 5 times.
- The Huff Cough Cycle (4 minutes):
- Inhale deeply (3 seconds).
- Hold (2 seconds).
- Huff forcefully twice (“haaaah, haaaah”).
- Rest and breathe normally for 30 seconds.
- Repeat this entire cycle 3 to 4 times.
- Final Clear and Hydration (2 minutes): Perform one gentle traditional cough if needed to clear the throat. Drink a large glass (16 oz / 473 ml) of room-temperature water to hydrate the mucosal lining, making any remaining secretions thinner and easier to manage throughout the day.
Consistent practice of this routine can significantly improve your daily baseline breathing. When your body is efficiently oxygenated, it is easier to improve daily energy without caffeine and maintain focus throughout your morning.
FAQ: The Huff Cough Technique
What is the main difference between huffing and coughing? Coughing involves a rapid, forceful closure of the glottis followed by a violent explosion of air, which can collapse small airways. Huffing keeps the glottis open, creating a steady, forced exhalation that moves mucus upward without causing airway collapse or throat irritation.
How many times a day should I do the huff cough technique? For general maintenance, 1 to 2 times a day is sufficient. If you are actively congested or recovering from a respiratory illness, you can safely perform the technique every 2 to 4 hours, always followed by a period of relaxed breathing to prevent dizziness.
Can the huff cough technique help athletes? Yes. Athletes, especially those in endurance sports or cold environments, can use it to clear thick respiratory secretions post-workout. It also serves as an excellent drill for learning diaphragmatic control and transversus abdominis engagement, which are vital for core stability.
Is it normal to feel dizzy when doing the huff cough? Mild lightheadedness can occur if you perform too many huffs in a row without resting, as this blows off too much carbon dioxide. To fix this, strictly enforce a 20- to 30-second period of normal, relaxed breathing between every 1 or 2 huffs.
Can children learn the huff cough technique? Yes, but it requires age-appropriate cues. Instead of “fogging a mirror,” you might tell a child to “breathe like a tired dog” or “make the sound of Darth Vader.” Pediatric respiratory therapists are highly skilled at teaching this technique to children with cystic fibrosis or asthma.
Does the huff cough technique help with acid reflux or GERD? While it does not directly treat GERD, the deep diaphragmatic breathing involved can strengthen the crural diaphragm, which acts as a physiological sphincter at the base of the esophagus. However, avoid performing forced huffs immediately after a large meal to prevent upward pressure on the stomach.
Conclusion
Mastering the huff cough technique is a small investment of time that yields massive returns for your respiratory health, core stability, and overall well-being. By replacing harsh, damaging coughs with controlled, open-glottis forced expirations, you protect your airways while efficiently clearing unwanted secretions. Whether you are managing a chronic lung condition, recovering from an illness, or simply looking to optimize your breathing mechanics for better athletic performance, this technique is a foundational tool.
Start with the basic seated progression, focus on the “fogging the mirror” cue, and always prioritize recovery breathing between cycles. As with any health intervention, consistency is key. Make this technique a regular part of your daily routine, and your lungs will thank you.