Noticing a small, soft bump catching on your shirt collar or gym towel during a workout can be frustrating. Learning how to remove skin tags at home safely starts with separating risky internet myths from evidence-based skin care and smart training habits. Because skin growths can sometimes mimic more serious conditions, you should always check with a doctor, dermatologist, or physical therapist before attempting any removal or changing your health routine.
As a strength and conditioning coach, I frequently see active adults deal with skin friction around the neck, underarms, chest, and groin. Heavy lifting belts, backpack straps, tight sports bras, and repetitive cardio movements create the exact warm, high-friction environment where skin tags thrive. Beyond mechanical rubbing, research shows these tiny growths are closely tied to your metabolic health and blood sugar control.
In this guide, we will break down what clinical science says about at-home removal options, why certain DIY hacks cause more harm than good, and how to protect your skin during training. You will also get a complete low-friction metabolic workout program designed to improve insulin sensitivity and reduce the chafing that triggers new growths.
Quick Answer: How to Remove Skin Tags at Home Safely
The safest way to manage a skin tag at home is to have a doctor confirm it is benign, avoid cutting or burning it with household acids, and only use pharmacist-approved over-the-counter cryotherapy or ligation kits on tiny growths under 0.08 inches (2 mm). Pair gentle care with friction-free workouts and metabolic training to prevent new ones.
Understanding Skin Tags and How to Remove Skin Tags at Home Safely
Before you touch any bump on your body, you need to know what you are dealing with. Medically known as acrochordons, skin tags are benign, non-cancerous growths made of loose collagen fibers and tiny blood vessels surrounded by a thin layer of skin. According to clinical data published in StatPearls on the NCBI Bookshelf, roughly 50% to 60% of adults will develop at least one skin tag during their lifetime, with the likelihood increasing after age 40.
Most skin tags measure between 0.04 inches (1 mm) and 0.2 inches (5 mm) in diameter, though some in high-friction creases can grow up to 0.8 inches (2 cm) across. They usually hang off the skin by a tiny, narrow stalk called a peduncle. Because they contain living nerve endings and capillary loops inside that stalk, irritating or tearing them during a workout can lead to surprising pain and bleeding.
The Two Main Triggers: Mechanical Friction and Metabolic Health
Why do skin tags pop up in the first place? The science points to two primary drivers that every active person should understand:
- Repetitive Skin-on-Skin and Gear Friction: Skin tags almost always cluster in body folds and high-rubbing zones. These include the sides of the neck, the armpits (axillae), under the breasts, the eyelids, and the groin crease. When you run 3 miles (4.8 km) in a humid gym or perform high-rep upper-body presses, skin rubs against skin or damp fabric thousands of times, stimulating local skin cell growth factors.
- Insulin Resistance and Metabolic Signalling: Skin tags are not just a surface issue; they are often an external marker of what is happening inside your metabolism. A clinical study indexed on PubMed investigating skin tags and insulin resistance found that having multiple skin tags is strongly associated with elevated insulin levels and impaired carbohydrate metabolism. When insulin stays chronically high in the bloodstream, it activates insulin-like growth factor 1 (IGF-1) receptors in the skin, telling tissue cells and fibroblasts to multiply faster than normal.
Understanding this internal connection changes how we approach the problem. Figuring out whether can supplements improve insulin sensitivity alongside strength training and nutrition helps you address the root environment so fewer tags show up year after year.
Evaluating Popular Methods for How to Remove Skin Tags at Home Safely
Walk down a pharmacy aisle or scroll through social media, and you will see dozens of products promising to erase skin tags overnight. However, dermatologists and health agencies urge extreme caution. Let’s look at what the evidence actually says about the most common methods people use when researching how to remove skin tags at home safely.
1. Over-the-Counter (OTC) Cryotherapy Kits
Pharmacy freezing kits use nitrous oxide or a blend of dimethyl ether and propane to freeze the growth, similar to a mild version of the liquid nitrogen a dermatologist uses. When applied accurately to the stalk, extreme cold forms ice crystals inside the cells, cutting off blood flow so the tag dries up and falls off in 10 to 14 days.
While OTC cryotherapy can work on tiny, stalked tags measuring 0.08 to 0.12 inches (2 to 3 mm), the applicator tip is often wider than the skin tag itself. If the freezing foam touches the healthy skin around the base, it can cause blistering, raw sores, or permanent light or dark spots (hypopigmentation or hyperpigmentation), especially on darker skin tones.
2. Ligation Bands and Micro-Rings
Ligation involves placing a tiny silicone or rubber micro-band tightly around the narrow base of the skin tag using a small cone applicator. The band squeezes the tiny blood vessel inside the peduncle, starving the tissue of oxygen until it turns dark, shrivels, and drops off within 7 to 10 days.
For ligation to be considered at all, the skin tag must have a very distinct, narrow neck and measure roughly 0.08 to 0.16 inches (2 to 4 mm) wide. If a tag is flat, broad-based, or larger than 0.2 inches (5 mm), a band can slip off or partially crush the tissue, leaving an open, necrotic sore that easily gets infected by gym sweat.
3. Natural Remedies: Apple Cider Vinegar, Tea Tree Oil, and Garlic
Many home guides suggest soaking a cotton ball in apple cider vinegar (ACV), pure tea tree oil, or crushed garlic and taping it over a skin tag for hours at a time. From a physiological standpoint, these methods work only by causing a localized chemical burn or allergic contact dermatitis.
Medical experts at the Cleveland Clinic guide on skin tags advise against using household acids and essential oils to burn off growths. Vinegar contains acetic acid, which breaks down healthy skin barriers just as fast as it erodes the tag. Covering an acid-soaked pad with tape often eats a raw, painful crater measuring 0.4 inches (1 cm) or wider around a tiny bump, leaving behind a permanent scar that is far more noticeable than the original skin tag.

4. Unapproved High-Concentration Salicylic Acid and Caustic Creams
Some online gels, Liquids, and moles-and-tag creams contain high concentrations of salicylic acid, bloodroot (sanguinarine), or caustic alkalis. You should avoid these entirely. Unregulated creams cannot tell the difference between a skin tag and normal dermis, frequently leading to deep tissue damage, severe skin infections, and emergency dermatology visits.
Common Mistake: Cutting or Clipping Skin Tags Yourself
Never use nail clippers, sewing scissors, razor blades, or dental floss to snip off a skin tag in your bathroom. Unlike dead calluses on your hands from lifting barbells, skin tags have an active blood supply and nerve fibers running right into the center of the stalk. Snipping a tag with unsterilized household tools causes surprisingly heavy bleeding that is hard to stop and introduces bacteria like Staphylococcus aureus directly into your bloodstream.
Comparison Table: At-Home Options vs. Clinical Removal
To help you make a smart, safe decision, compare the risks, target sizes, and recovery times of common methods below. Notice how clinical procedures require zero guesswork and allow you to return to full-sweat workouts much faster.
| Method | Ideal Growth Size | How It Works | Recovery & Healing Time | Safety & Risk Profile |
| Leave Alone + Friction Care | Any size | Moisture-wicking clothes and anti-chafe balm stop rubbing | Immediate (0 days downtime) | Safest at-home option; zero risk of scarring or infection |
| OTC Ligation Micro-Bands | 0.08–0.16 in (2–4 mm) stalked | Cuts off capillary blood supply at the narrow base | 7–14 days for tag to dry and drop off | Moderate risk; can cause local soreness or infection if knocked off early |
| OTC Cryotherapy Freezing Kit | 0.08–0.12 in (2–3 mm) stalked | Freezes cellular water inside the growth | 10–14 days; may require a 2nd application | Moderate risk; can blister or discolor surrounding skin |
| Apple Cider Vinegar / Tea Tree Oil | Not recommended | Causes acid erosion or contact dermatitis | 2–4 weeks if skin chemical burn occurs | High risk; high rate of chemical burns, scarring, and raw skin |
| DIY Cutting / Nail Clippers | Never recommended | Mechanical shearing without sterile hemostasis | Weeks if infected | Dangerous; uncontrolled bleeding, high staph infection risk |
| Dermatologist Snip Excision | 0.04–0.8 in (1–20 mm) | Sterile numbing + surgical iris scissors + coagulant | 3–5 days for tiny surface scab to heal | Gold standard; sterile, instant removal, can biopsy if needed |
| Clinical Cryotherapy / Cautery | Any size | Precision liquid nitrogen or electrodesiccation | 5–10 days | Very safe; seals blood vessels immediately to prevent bleeding |
Step-by-Step Protocol: How to Care for Skin Tags and Prevent Chafing
If a healthcare provider has looked at your skin and confirmed that your bumps are harmless skin tags, you have two smart paths forward: having the doctor snip them off in five minutes, or using a strict hygiene and friction-management protocol at home.
If you are using a pharmacist-recommended OTC kit on a tiny, confirmed skin tag on your torso or neck, follow these five safety steps to protect your skin barrier:
- Perform a Size and Location Check: Use a small ruler to measure the growth. Never attempt at-home care on any growth larger than 0.16 inches (4 mm), anything without a narrow stalk, or any tag located on your eyelids, groin, genitals, or mucous membranes.
- Sanitize the Area Thoroughly: Wash your hands and the skin around the tag with mild antibacterial soap and warm water for 30 seconds. Pat dry with a clean paper towel—not a used gym towel—and wipe the area gently with a 70% isopropyl alcohol prep pad.
- Protect the Surrounding Healthy Skin: If using an OTC freezing tip, apply a thin ring of plain petroleum jelly around the base of the tag using a sterile cotton swab. Keep the jelly 0.04 inches (1 mm) away from the stalk itself; this acts as an insulating shield so cold vapor does not burn healthy skin.
- Keep Hands Off While It Heals: Whether a treated tag is drying up from a ligation band or freezing kit, never twist, pull, or pick at it before it falls off on its own. Pulling it early tears the living dermis underneath and causes bleeding.
- Shield From Gym Sweat and Rubbing: While a treated spot heals, cover it during workouts with a sterile hydrocolloid bandage or breathable silicone dressing measuring at least 0.75 inches (1.9 cm) across. Change the dressing immediately after you shower post-workout.
Coach’s Low-Friction & Metabolic Workout Routine
Why include a strength and cardio routine in an article about skin tags? Because solving the problem long-term requires fixing both the external rubbing and the internal metabolic environment. According to the CDC physical activity guidelines, adults need at least 150 minutes of moderate-intensity aerobic activity and two days of muscle-strengthening work each week to maintain healthy blood sugar and body composition.
Furthermore, the Mayo Clinic overview on metabolic syndrome notes that carrying excess visceral fat—defined as a waist circumference over 40 inches (102 cm) for men or 35 inches (89 cm) for women—drives up insulin resistance, which directly fuels skin tag growth.
As a coach, I designed the 3-Day Low-Friction Metabolic Circuit below for clients who want to improve insulin sensitivity and burn fat without irritating sensitive skin folds in the neck, armpits, or inner thighs. For instance, we replace barbell back squats (which grind a heavy knurled bar right across the back of the neck where skin tags form) with goblet squats, and we swap high-chafe running for smooth, controlled movements.

Workout Summary Table
Perform this full-body routine 3 days per week (for example, Monday, Wednesday, and Friday), leaving at least 48 hours of recovery between sessions.
| Exercise | Sets | Reps / Distance | Tempo | Rest Time | Suggested Starting Load |
| 1. Dumbbell Goblet Squat | 3 | 10–12 reps | 3-1-1-0 | 60 sec | Women: 20–30 lb (9–14 kg) / Men: 35–50 lb (16–23 kg) |
| 2. Hands-Elevated or Floor Push-Up | 3 | 8–12 reps | 2-1-1-0 | 60 sec | Bodyweight (Bench height: 18–24 in / 45–60 cm) |
| 3. Dumbbell Romanian Deadlift (RDL) | 3 | 10–12 reps | 3-1-1-0 | 75 sec | Women: 15–25 lb (7–11 kg) / Men: 30–45 lb (14–20 kg) per hand |
| 4. Wide-Grip Seated Cable Row | 3 | 12–15 reps | 2-0-1-2 | 60 sec | Women: 50–70 lb (23–32 kg) / Men: 85–120 lb (39–54 kg) |
| 5. Farmer’s Carry | 3 | 100 ft / 0.02 miles (0.03 km) | Brisk walk | 90 sec | Women: 20–30 lb (9–14 kg) / Men: 40–60 lb (18–27 kg) per hand |
| 6. Low-Chafe Cardio Finisher | 1 | 1.5 miles (2.4 km) walk or 3 miles (4.8 km) bike | Steady pace | Cool down | 4%–6% incline treadmill walk or moderate stationary bike |
Note on Tempo: A 3-1-1-0 tempo means taking 3 seconds to lower the weight, pausing 1 second at the bottom, taking 1 second to lift the weight, and taking 0 seconds at the top before starting the next rep.
How to Do Each Exercise (With Anti-Chafe Form Cues)
1. Dumbbell Goblet Squat (Replaces Neck-Irritating Barbell Back Squats)
Resting a rough steel barbell across your upper traps can tear or inflame skin tags along the base of your neck. The goblet squat builds strong quadriceps, glutes, and core muscles while keeping your neck completely free of pressure.
- Form Cues: Stand with your feet shoulder-width apart, roughly 16 to 20 inches (40 to 50 cm) wide, with your toes turned out 15 degrees. Hold one dumbbell vertically by the top bell against your sternum, keeping it 1 inch (2.5 cm) away from your shirt so it does not rub your chest skin. Sit your hips back and down over 3 seconds until your thighs are parallel to the floor, pause for 1 second, and drive through your mid-foot to stand tall.
- What It Should Feel Like: You should feel deep muscular tension in your front thighs and glutes, with your upper back working gently to stay upright—zero pinching in your neck or lower back.
- Easier Version (Regression): Perform a Box Goblet Squat to an 18-inch (45 cm) bench using a light 10 lb (4.5 kg) dumbbell, tapping your glutes gently to the box before standing.
- Harder Version (Progression): Slow the lowering phase down to 4 seconds with a 2-second pause at the bottom, or increase the load to a 55 to 70 lb (25 to 32 kg) dumbbell or kettlebell.
2. Hands-Elevated or Floor Push-Up (Low Underarm Friction)
Wide-arm chest presses on rough gym benches often pinch the skin in the front armpit crease (anterior axillary fold). A controlled push-up with a 45-degree elbow angle strengthens your chest, shoulders, and triceps without scraping your underarms against upholstery.
- Form Cues: Place your hands slightly wider than shoulder-width on a sturdy 18-to-24-inch (45 to 60 cm) bench or the floor. Brace your glutes and abs so your body forms a straight line from head to heels. Lower your chest over 2 seconds while keeping your elbows angled about 45 degrees from your ribs—creating a comfortable 3 to 4 inch (7.5 to 10 cm) air gap in your armpit so skin does not pinch together. Press smoothly back to full arm extension.
- What It Should Feel Like: Strong contraction across your chest and the backs of your arms, with your core feeling rock-solid like a plank.
- Easier Version (Regression): Elevate your hands higher onto a 36-inch (91 cm) barbell set in a squat rack or a sturdy countertop.
- Harder Version (Progression): Perform full floor push-ups with your feet elevated on a 12-inch (30 cm) aerobic step, or wear a snug, padded 10 to 20 lb (4.5 to 9 kg) weighted vest over a thick cotton shirt.

3. Dumbbell Romanian Deadlift (Glucose-Clearing Posterior Chain Work)
Your hamstrings and glutes are among the largest muscle groups in your body. Training them acts like a sponge for blood glucose, helping clear sugar from your bloodstream without needing huge spikes in insulin.
- Form Cues: Stand tall with your feet hip-width apart (about 8 to 10 inches / 20 to 25 cm between your heels) holding a pair of dumbbells in front of your thighs. Unlock your knees slightly and push your hips straight back toward the wall behind you over 3 seconds, letting the dumbbells glide down 1 inch (2.5 cm) in front of your shins until they reach mid-shin height. Pause for 1 second when you feel a firm hamstring stretch, then drive your hips forward to stand tall.
- What It Should Feel Like: A deep, loaded stretch down the backs of your thighs and glutes—never a sharp pull in your lower spine.
- Easier Version (Regression): Hold a single 15 to 20 lb (7 to 9 kg) dumbbell with both hands between your legs and limit the range of motion to just below your knees.
- Harder Version (Progression): Use heavier 50 to 70 lb (23 to 32 kg) dumbbells with lifting straps, or perform a B-Stance (kickstand) RDL to load one leg with 80% of the weight.
4. Wide-Grip Seated Cable Row (Airflow-Friendly Upper Back Builder)
Narrow-grip rowing where you scrape your elbows tight against your ribs can irritate skin tags under the arms. Using a slightly wider neutral-grip handle lets you build posture-correcting upper-back muscle while keeping air flowing around your torso.
- Form Cues: Sit tall at a cable row station with your feet braced on the platform and knees slightly bent. Grab a 20-to-24-inch (50 to 60 cm) wide neutral-grip bar. Pull the handle toward your upper abs in 1 second, letting your elbows travel back at a comfortable 30-to-45-degree angle rather than clamping your armpits shut. Squeeze your shoulder blades together hard for 2 full seconds before taking 2 seconds to return the weight.
- What It Should Feel Like: A warm, muscular squeeze right between your shoulder blades and across your mid-back.
- Easier Version (Regression): Use a light resistance band anchored around a sturdy post at chest height for 15 smooth reps.
- Harder Version (Progression): Increase the stack by 10 to 15 lb (4.5 to 7 kg) or perform a Chest-Supported Incline Dumbbell Row on a 45-degree bench covered with a clean microfiber towel.
5. Farmer’s Carry (Full-Body Metabolic Conditioning)
Loaded carries recruit muscles from your grip and traps all the way down to your calves while keeping your arms slightly away from your sides so your underarms do not chafe.
- Form Cues: Pick up two moderately heavy dumbbells and stand tall with your shoulders pulled back and down. Actively hold the dumbbells 1 to 2 inches (2.5 to 5 cm) outside your outer thighs so the weights do not rub against your hips or legs. Walk forward with crisp, short 18-inch (45 cm) steps for 100 feet—roughly 0.02 miles (0.03 km).
- What It Should Feel Like: Your forearms, upper traps, and deep core muscles working together to keep your torso completely upright without swaying side to side.
- Easier Version (Regression): Carry lighter 15 lb (7 kg) dumbbells for 50 feet (15 meters), resting 60 seconds between trips.
- Harder Version (Progression): Carry heavy 60 to 80 lb (27 to 36 kg) dumbbells or a trap bar for 150 feet (45 meters), or perform a Suitcase Carry holding one weight in a single hand to challenge your obliques.
6. Low-Chafe Cardio Finisher (Steady-State Fat Oxidation)
High-impact jogging often causes repetitive skin rubbing along the inner thighs, underarms, and chest. Finishing your lifting session with low-impact steady-state cardio burns extra calories and boosts insulin sensitivity with minimal mechanical friction.
- Form Cues: Hop onto a treadmill set to a 4% to 6% incline and walk briskly at 3.0 to 3.5 mph (4.8 to 5.6 km/h) for 1.5 miles (2.4 km), swinging your arms gently without brushing your ribs. Alternatively, ride an upright stationary bike with a wider, supportive saddle for 3 miles (4.8 km) at a brisk cadence of 80 to 90 RPM.
- What It Should Feel Like: Your breathing should be elevated enough that you can speak in short sentences, with a steady sweat and zero skin pinching.
- Easier Version (Regression): Walk 0.75 miles (1.2 km) on a flat 0% grade at 2.5 mph (4.0 km/h).
- Harder Version (Progression): Walk 2.0 miles (3.2 km) at an 8% to 10% incline at 3.5 mph (5.6 km/h).
Coach’s Tip: Use the “Two-Finger Clearance Rule” for Gym Gear
If you are prone to skin tags around your neck, chest, or underarms, check the seams of your workout shirts and sports bras before you train. You should be able to slide two fingers—roughly 1.25 inches (3.2 cm)—comfortably between the armhole seam and the bottom of your armpit crease. If an elastic band or rough flatlock seam digs directly into your skin fold, swap it out or apply a thin layer of silicone anti-chafe balm before warming up.
By following the ACSM physical activity guidelines for progressive resistance training and pairing it with strategies on how to support metabolism naturally, you build lean muscle mass that keeps blood sugar stable 24 hours a day. Over time, improved body composition shrinks deep skin folds, cutting down skin-on-skin friction permanently.
Critical Safety Notes: When to Skip Home Care and See a Doctor
Even when you know how to remove skin tags at home safely, some skin growths should never be touched outside of a medical clinic. Skin cancer—including amelanotic melanoma, basal cell carcinoma, and squamous cell carcinoma—as well as viral warts and molluscum contagiosum, can occasionally look like a harmless skin tag to the untrained eye.
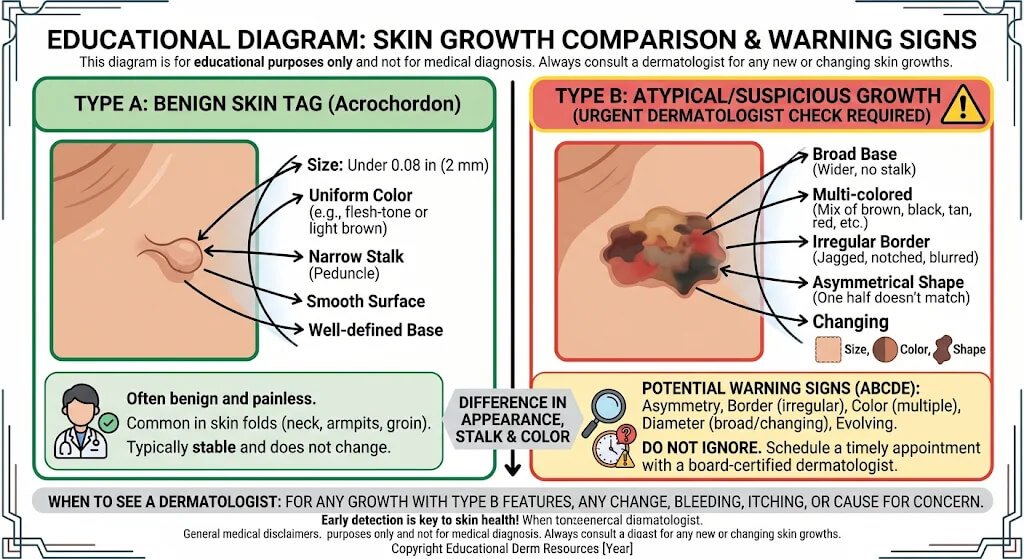
Stop immediately and schedule an appointment with a board-certified dermatologist or primary care doctor if you notice any of the following red flags:
- Size Over 0.16 Inches (4 mm): Larger growths have thicker blood vessels running through the base and frequently bleed heavily if irritated or ligated at home.
- Broad, Flat Base (No Narrow Stalk): If the bump sits flat against your skin like a dome rather than hanging by a tiny thread-like neck, OTC bands and freezing kits will fail and damage surrounding skin.
- Multiple Colors or Color Changes: Benign skin tags are uniform flesh-colored, tan, or slightly darker brown. If a bump has shades of black, blue, red, pink, or uneven blotches, have it biopsied.
- Spontaneous Bleeding, Oozing, or Crusting: A growth that bleeds without being snagged on clothing or refuses to heal is a classic warning sign that needs a clinical exam.
- Firm, Hard, or Rapidly Growing Texture: True acrochordons feel soft and pliable, like a tiny piece of deflated dough. A hard, crusty, or rapidly expanding nodule requires medical evaluation.
- Sensitive Anatomical Locations: Never use OTC freezing sprays, bands, or creams near your eyes, eyelids, lips, groin, genitals, or perianal area. A dermatologist has specialized precision tools to treat these delicate areas safely in minutes.
Furthermore, if you have already tried an at-home method and notice expanding redness wider than 0.4 inches (1 cm) around the spot, throbbing warmth, yellow pus, red streaks, or a fever, seek medical care right away to treat a potential skin infection.
Related Coach’s Tips for Skin Elasticity, Hygiene, and Metabolic Health
Keeping your skin smooth, resilient, and free of irritation goes beyond the weight room. Use these practical lifestyle habits to support your skin barrier and metabolic health from the inside out:
1. Support Skin Structure with Collagen and Antioxidants
Skin tags consist of loosely bundled collagen fibers that have lost their organized structure due to friction and metabolic stress. Supporting healthy dermal elasticity starts with adequate protein and micronutrient intake. Learning the best time to take collagen powder along with vitamin C can help provide the amino acid building blocks your skin needs to repair micro-abrasions from exercise. If you are curious about realistic timelines for skin nourishment, check out our breakdown on how long for collagen supplements to work.
2. Calm Skin Inflammation with Essential Fatty Acids
Dry, irritated skin creates far more friction when rubbing against gym clothes than well-hydrated skin. Incorporating cold-water fatty fish or reading up on omega-3 fatty acids for skin hydration can help reinforce your skin’s lipid barrier and calm redness after sweaty training sessions. You can also explore how an astaxanthin supplement for skin glow supports cellular defense against oxidative stress, especially if you walk or cycle outdoors in the sun.
3. Optimize Blood Sugar and Sleep Recovery
Because high insulin levels signal skin cells to overgrow, stabilizing your daily blood sugar is one of the best defenses against recurring skin tags. Pair your resistance training with high-fiber vegetables, lean proteins, and smart lifestyle habits. Many adults also discuss with their healthcare provider whether berberine can support metabolic health alongside diet and exercise. Equally important, never overlook rest: understanding how sleep affects metabolism and weight is vital, because even a few nights of sleeping less than 6 hours can temporarily reduce insulin sensitivity by 20% to 30%.
4. Upgrade Your Post-Workout Hygiene Routine
Sweat left drying in skin folds deposits salt crystals on the skin. When you walk around in damp gym clothes for an hour after lifting, those tiny salt crystals act like fine sandpaper inside your neck creases, armpits, and groin. Shower within 15 to 20 minutes of finishing your workout using a gentle, fragrance-free cleanser, pat your skin folds completely dry with a clean towel, and change into loose, breathable fabrics.
Frequently Asked Questions (FAQ)
Can you cut off a skin tag at home with nail clippers?
No, you should never cut off a skin tag at home with nail clippers, scissors, or razor blades. Skin tags contain living nerve fibers and a central blood vessel that can bleed heavily when cut, and unsterilized household tools introduce dangerous bacteria that can cause serious skin infections.
Do over-the-counter skin tag freezing kits work?
Over-the-counter cryotherapy freezing kits can remove small, narrow-stalked skin tags under 0.12 inches (3 mm) by freezing the tissue so it drops off in 10 to 14 days. However, they do not reach the cold temperatures of clinical liquid nitrogen and may blister or discolor surrounding healthy skin.
Does apple cider vinegar remove skin tags safely?
No, dermatologists warn against using apple cider vinegar to remove skin tags. The acetic acid in vinegar works by causing a localized chemical burn, which frequently damages the healthy skin around the growth, resulting in painful raw sores, delayed healing, and permanent scarring.
Are skin tags a sign of insulin resistance or weight gain?
Yes, clinical studies show a strong link between having multiple skin tags and underlying insulin resistance, elevated blood sugar, and higher body fat levels. Elevated insulin activates growth receptors in the skin, while deeper skin folds increase the friction that triggers new tags to form.
How can I stop workout clothes from irritating skin tags?
Choose seamless, moisture-wicking workout tops with at least 1.25 inches (3.2 cm) of underarm clearance, and remove necklaces or rough collar tags before training. You can also cover an easily snagged skin tag with a small hydrocolloid bandage or apply anti-chafe balm before exercising.
When should a doctor check a skin tag before removal?
Always have a doctor or dermatologist check a skin growth if it is larger than 0.16 inches (4 mm), bleeds spontaneously, changes color, feels firm, lacks a narrow stalk, or sits on sensitive areas like the eyelids or groin. A quick exam rules out skin cancer and ensures safe removal.
Conclusion: How to Remove Skin Tags at Home Safely Without Risking Your Skin
Knowing how to remove skin tags at home safely comes down to respecting your skin’s biology and refusing to take dangerous shortcuts. Skip the bathroom scissors, nail clippers, and acidic kitchen remedies like apple cider vinegar, which trade a tiny, harmless bump for bleeding, chemical burns, and permanent scars. Instead, have a doctor verify that any growth is truly a benign acrochordon, rely on clinical removal for anything larger or in a sensitive spot, and only use pharmacist-approved OTC ligation or freezing kits on tiny, stalked tags with strict hygiene.
Just as importantly, take charge of the mechanical and metabolic triggers that cause skin tags to multiply. By wearing low-friction workout gear, showering promptly after training, and committing to our 3-day low-chafe strength and cardio routine, you can improve your insulin sensitivity, reduce skin-on-skin rubbing, and feel confident in your body for years to come.